Spraddle Leg
Spraddle Leg
February 13, 2022
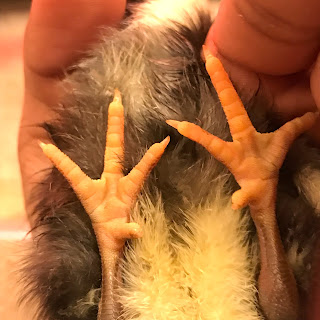
(This is what normal chick feet look like.)
Hopefully you will never have to worry about a chick with spraddle leg or curled toes, but as is the case with everything else chicken-related, it's always best to be prepared.
Spraddle leg (also called splayed leg) a condition that a chick is either born with or develops within the first few hours of life whereby one or both legs slip out to the sides making them unable to stand or walk. Spraddle leg can occur during incubation or the hatching process if the temperature is too high or varies too much during the incubation period or if the hatch is difficult for the chick.
The more common cause of spraddle leg is an incubator or brooder floor that is too slippery for the chick to grip, which causes the legs to slide to one side. As a result the chick's legs muscles don't develop properly because of the lack of traction. To try and prevent this condition in your newly hatched chicks, a sheet of paper towel or rubber shelf liner should always be put in the incubator just before the lockdown. This gives the baby chicks more stability for their still-weak legs.
Newspaper should never be used in the brooder as the only floor covering - opt for rubber shelf liner instead to give your chickens a better, textured surface to grip. Especially when it gets wet, newspaper is too slippery and the primary cause of spraddle leg in baby chicks. They just can't get their legs to stay under them on such a slick surface. So instead of using just newspaper, I cover a few layers of newspaper with a sheet of shelf liner. The rubber surface, just as in the incubator, provides a nice textured surface for little feet.
What you need to do is hobble the chick's legs. The easiest way is to cut a thin piece of Vetrap (approximately 1/4" wide and 5" long) and loosely wrap it around each leg, connecting the ends in the middle, about an inch apart, in sort of a figure eight. Vetrap sticks to itself so it should stay put without any tape or other adhesive. You can also use a bandaid, centering the padded section between the chick's legs, but be sure not to stick the adhesive to the chicks legs because it can be hard to get off. The chick's legs should be about normal width apart when extended once you wrap the legs with the Vetrap. If the chick can't stand up, you can make them a bit wider apart for better balance, but then bring them in a bit closer together each day.
Be sure the chick has something it can easily walk on like paper towel, a bath towel or shelf liner. At first the chick will likely have trouble standing up, but soon should get used to the hobble and be able to get around pretty well.
The chick should be "cured" pretty quickly, all things considered. Unwrap the legs and check the chick's progress once or twice a day. Leave the hobble on until the chick can comfortably stand and walk on its own. This could take from a few days to up to a week. You should see results fairly quickly and soon your chick will be up and about.
Then make a solemn vow: no more plain newspaper in the brooder!


Comments
Post a Comment